3.1. Basic usage
The procedure to use the batch job script generator moller consists of the following steps:
First, a job description file is prepared that defines the tasks to be executed. Next, the program moller is to be run with the job description file, and a batch job script is generated. The script is then transferred to the target supercomputer system. A batch job is submitted with the script to perform calculations.
In this tutorial, we will explain the steps along a sample in docs/tutorial/moller.
Prepare job description file
A job description file describes the content of calculations that are carried out in a batch job.
Here, a batch job is used for a set of instructions submitted to job schedulers running on supercomputer systems.
On the other hand, for the concurrent execution of programs that moller handles, we call a series of program executions performed for one set of parameters by a job. A job may consist of several contents that we call tasks. moller organizes job execution so that each task is run in parallel, and the synchronization between the jobs is taken at every start and end of the tasks.
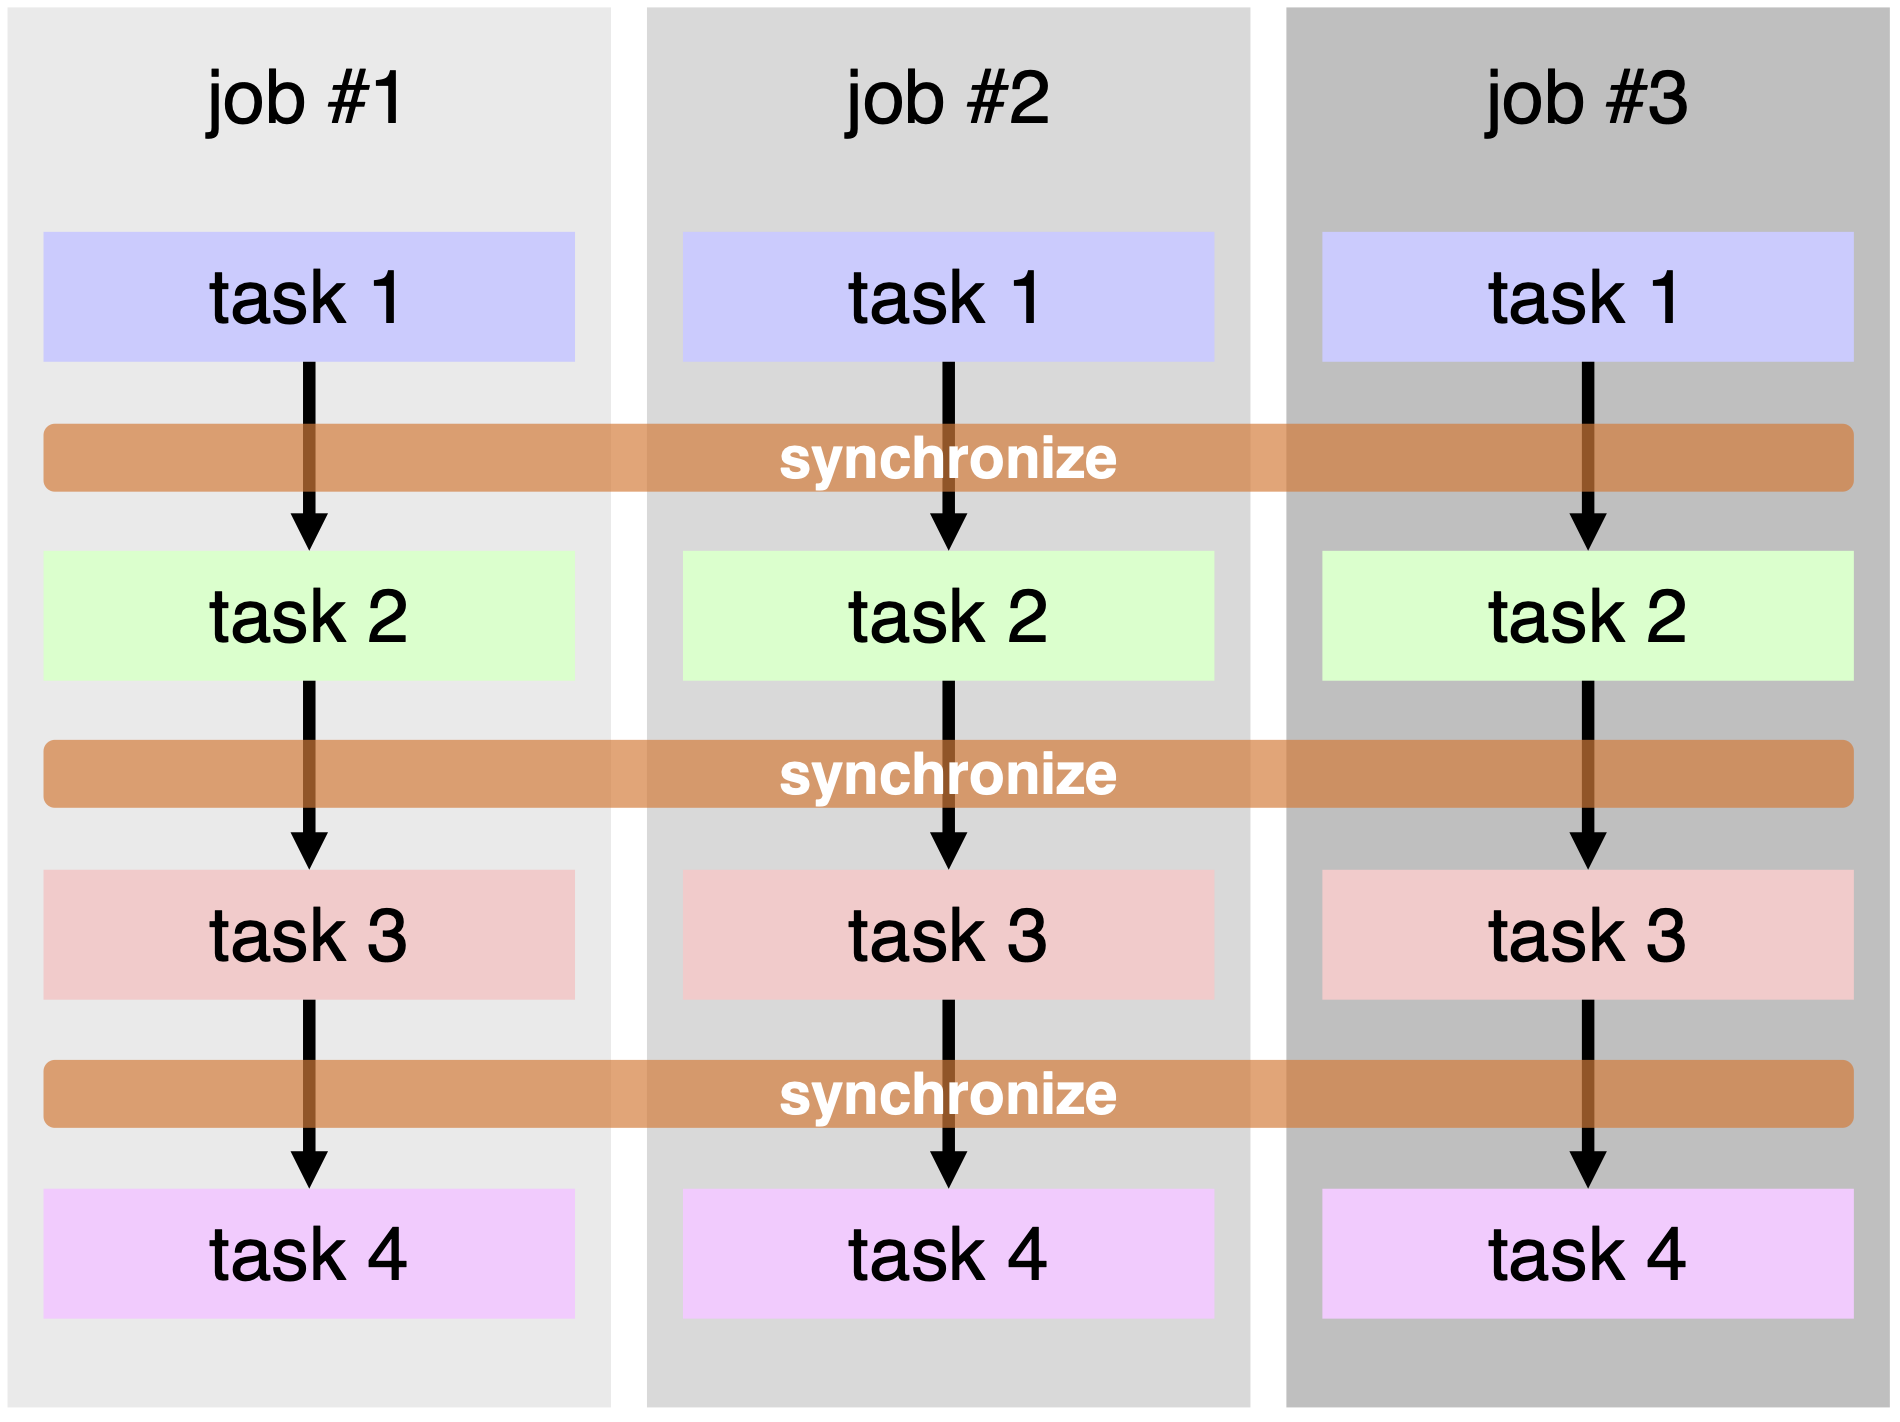
Fig. 3.1 An example of tasks and jobs: Three jobs #1 … #3 are carried out within a single batch job. Each job corresponds to different set of parameters. A job consists of 4 tasks. Each task is run in parallel among these three jobs.
An example of job description file is presented in the following. A job description file is in text-based YAML format. It contains parameters concerning the platform and the batch job, task descriptions, and pre/post-processes.
name: testjob
description: Sample task file

platform:
  system:  ohtaka
  queue:   i8cpu
  node:    1
  elapsed: 00:10:00

prologue:
  code: |
    module purge
    module load oneapi_compiler/2023.0.0 openmpi/4.1.5-oneapi-2023.0.0-classic

    ulimit -s unlimited

    source /home/issp/materiapps/intel/parallel/parallelvars-20210622-1.sh

jobs:
  start:
    parallel: false
    run: |
      echo "start..."

  hello:
    description: hello world
    node: [1,1]
    run: |
      echo "hello world." > result.txt
      sleep 2

  hello_again:
    description: hello world again
    node: [1,1]
    run: |
      echo "hello world again." >> result.txt
      sleep 2

epilogue:
  code: |
    echo "done."
    date
In the platform section, you can specify the type of platform on which to execute. In this case, settings for the System B (ohtaka) are being made.
The prologue section describes the preprocessing of the batch job. It details the common command line to be executed before running the task.
In the jobs section, the content of the task processing is described. The series of tasks to be executed in the job are described in a table format, with the task name as the key and the processing content as the value.
In this example, a task that first outputs “start…” is defined with the task name “start”.
Here, it is set to parallel = false.
In this case, the content of run parameter is executed sequentially.
Next, a task that outputs “hello world.” is defined with the task name “hello_world” .
Here, since “parallel” is not set, it is treated as parallel = true.
In this case, parallel processing is performed on a per-job basis.
Similarly, next, a task that outputs “hello world again.” is defined with the task name “hello_again”.
Finally, in the epilogue section, the post-processing of the batch job is described. It details the common command line to be executed after running the task.
For more details on the specifications, please refer to the chapter File Format.
Generate batch job script
moller is to be run with the job description file (input.yaml) as an input as follows:
$ moller -o job.sh input.yaml
A batch job script is generated and written to a file specified by the parameter in the job description file, or the command line option -o or --output. If both specified, the command line option is used. If neither specified, the result is written to the standard output.
The obtained batch job script is to be transferred to the target system as required. It is noted that the batch job script is prepared for bash; users may need to set the shell for job execution to bash. (A care should be needed if the login shell is set to csh-type.)
Create list file
A list of jobs is to be created. moller is designed so that each job is executed within a directory prepared for the job with the job name. The job list can be created, for example, by the following command:
$ /usr/bin/ls -1d * > list.dat
In this tutorial, an utility script make_inputs.sh is enclosed which generates datasets and a list file.
$ bash ./make_inputs.sh
By running the above command, a directory output and a set of subdirectories dataset-0001 … dataset-0020 that correspond to datasets, and a list file list.dat are created.
Run batch job
The batch job is to be submitted to the job scheduler with the batch job script.
In this example, the job script and the input parameter files are copied into the output directory, and the current directory is changed to ``output` as follows:
$ cp job.sh input.yaml output/
$ cd output
In ohtaka, slurm is used for the job scheduling system. In order to submit a batch job, a command sbatch is invoked with the job script as an argument.
Parameters can be passed to the script as additional arguments; the name of list file is specified as a parameter.
$ sbatch job.sh list.dat
Files named ‘result.txt’ will be generated in each directory listed on the list.dat. You can confirm that the ‘result.txt’ contains the strings ‘hello world.’ and ‘hello world again.’ as the job results.
Check status
The status of execution of the tasks are written to log files. A tool named moller_status is provided to generate a summary of the status of each job from the log files. It is invoked by the following command in the directory where the batch job is executed:
$ moller_status input.yaml list.dat
The command takes the job description file input.yaml and the list file list.dat as arguments. The list file may be omitted; in this case, the information of the jobs are extracted from the log files.
An example of the output is shown below:
| job          | hello   | hello_again   |
|--------------|---------|---------------|
| dataset-0001 | o       | o             |
| dataset-0002 | o       | o             |
| dataset-0003 | o       | o             |
| dataset-0004 | o       | o             |
| dataset-0005 | o       | o             |
| dataset-0006 | o       | o             |
| dataset-0007 | o       | o             |
| dataset-0008 | o       | o             |
| dataset-0009 | o       | o             |
| dataset-0010 | o       | o             |
| dataset-0011 | o       | o             |
| dataset-0012 | o       | o             |
| dataset-0013 | o       | o             |
| dataset-0014 | o       | o             |
| dataset-0015 | o       | o             |
| dataset-0016 | o       | o             |
| dataset-0017 | o       | o             |
| dataset-0018 | o       | o             |
| dataset-0019 | o       | o             |
| dataset-0020 | o       | o             |
where “o” corresponds to a task that has been completed successfully, “x” corresponds to a failed task, “-” corresponds to a skipped task because the previous task has been terminated with errors, and “.” corresponds to a task yet unexecuted. In the above example, the all tasks have been completed successfully.
Rerun failed tasks
If a task fails, the subsequent tasks within the job will not be executed. The following is an example of job status in which each task fails by 10% change.
| job          | task1   | task2   | task3   |
|--------------|---------|---------|---------|
| dataset_0001 | o       | o       | o       |
| dataset_0002 | o       | x       | -       |
| dataset_0003 | x       | -       | -       |
| dataset_0004 | x       | -       | -       |
| dataset_0005 | o       | o       | o       |
| dataset_0006 | o       | o       | o       |
| dataset_0007 | o       | x       | -       |
| dataset_0008 | o       | o       | o       |
| dataset_0009 | o       | o       | x       |
| dataset_0010 | o       | o       | o       |
| dataset_0011 | o       | o       | o       |
| dataset_0012 | o       | o       | o       |
| dataset_0013 | o       | x       | -       |
| dataset_0014 | o       | o       | o       |
| dataset_0015 | o       | o       | o       |
| dataset_0016 | o       | o       | o       |
| dataset_0017 | o       | o       | o       |
| dataset_0018 | o       | o       | o       |
| dataset_0019 | o       | o       | o       |
| dataset_0020 | o       | o       | o       |
There, the jobs of dataset_0003 and dataset_0004 failed at task1, and the subsequent task2 and task3 were not executed. The other jobs were successful at task1, and proceeded to task2. In this way, each job is executed independently of other jobs.
Users can rerun the failed tasks by submitting the batch job with the retry option. For SLURM job scheduler (e.g. used in ISSP system B), resubmit the job as follows:
$ sbatch job.sh --retry list.dat
For PBS job scheduler (e.g. used in ISSP system C), edit the job script so that the line retry=0 is replaced by retry=1, and resubmit the job.
| job          | task1   | task2   | task3   |
|--------------|---------|---------|---------|
| dataset_0001 | o       | o       | o       |
| dataset_0002 | o       | o       | x       |
| dataset_0003 | o       | x       | -       |
| dataset_0004 | o       | o       | o       |
| dataset_0005 | o       | o       | o       |
| dataset_0006 | o       | o       | o       |
| dataset_0007 | o       | o       | o       |
| dataset_0008 | o       | o       | o       |
| dataset_0009 | o       | o       | o       |
| dataset_0010 | o       | o       | o       |
| dataset_0011 | o       | o       | o       |
| dataset_0012 | o       | o       | o       |
| dataset_0013 | o       | o       | o       |
| dataset_0014 | o       | o       | o       |
| dataset_0015 | o       | o       | o       |
| dataset_0016 | o       | o       | o       |
| dataset_0017 | o       | o       | o       |
| dataset_0018 | o       | o       | o       |
| dataset_0019 | o       | o       | o       |
| dataset_0020 | o       | o       | o       |
The tasks that have failed will be executed in the second run. In the above example, the task1 for dataset_0003 was successful, but the task2 failed. For dataset_0004, task1, task2, and task3 were successfully executed. For the jobs of datasets whose tasks have already finished successfully, the second run will not do anything.
N.B. the list file must not be modified on the rerun. The jobs are managed according to the order of entries in the list file, and therefore, if the order is changed, the jobs will not be executed properly.